
Hair color for your skin tone, previewed on your photo
Undertone and contrast give you a starting shortlist. Lighting changes how skin reads in photos, so preview a few shades on one consistent photo before deciding.
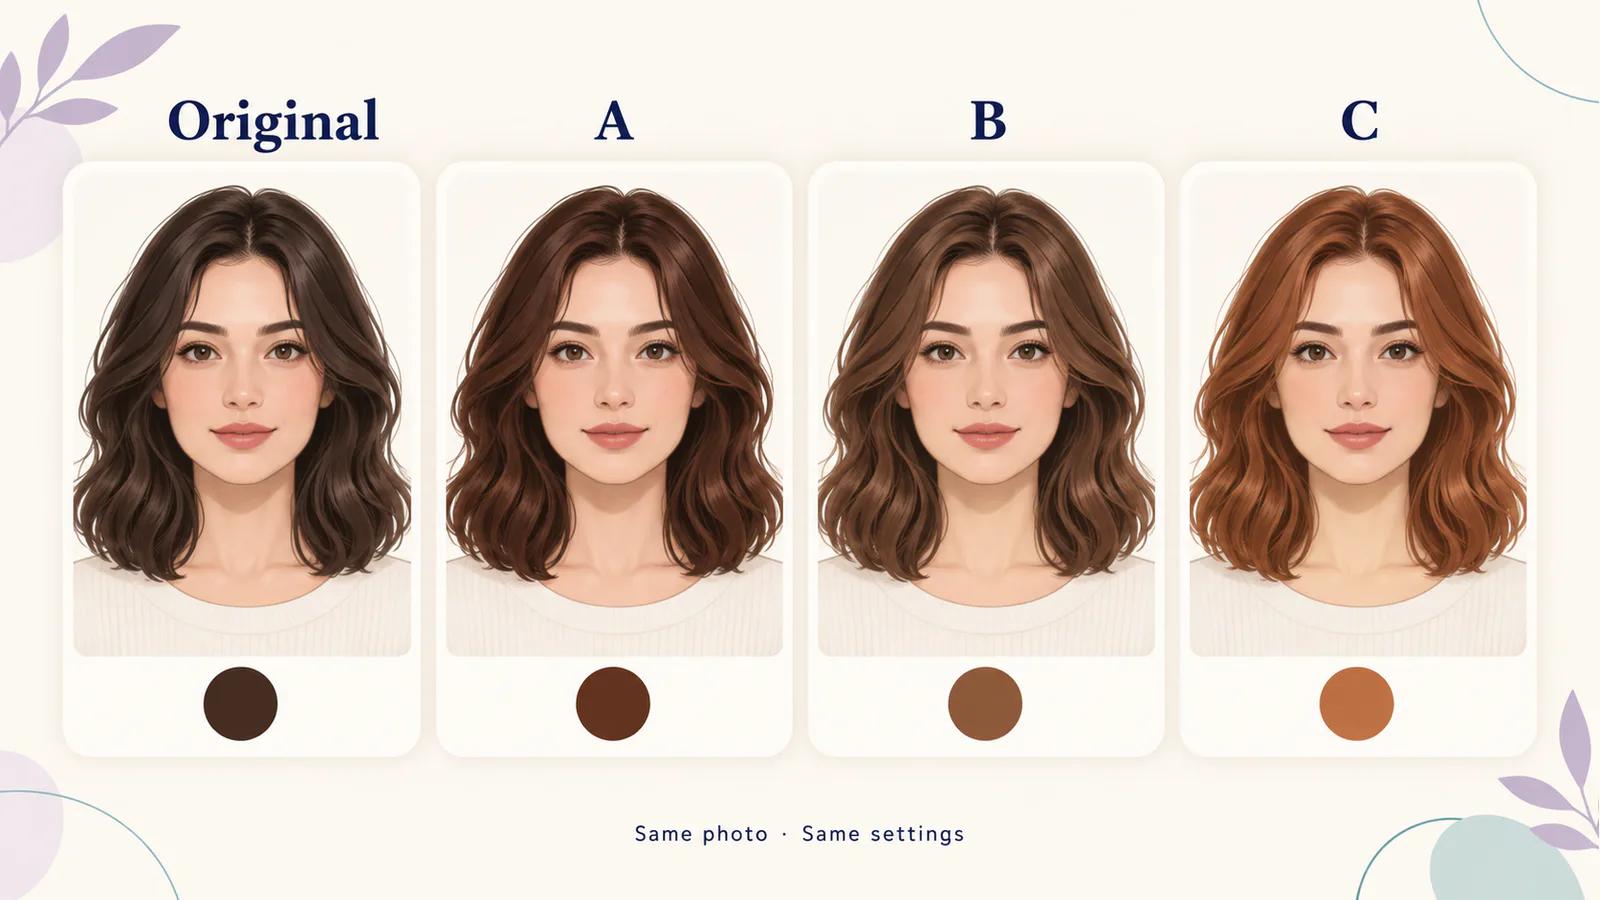
TL;DR
The shortest version before the full guide.
- Skin tone and undertone give you a starting shortlist, not a rule about which colors you can wear.
- Check undertone in daylight, without filters; warm indoor light can make everyone read warmer.
- Contrast between hair, skin, and brows often matters as much as warm versus cool.
- Preview two or three shades on one photo with the same Intensity and Shine.
- Bring your preferred preview to a colorist as a reference; a preview is not a dye formula.
Skin tone gives you a shortlist, not a rule
Hair color advice usually starts with skin tone and undertone. That is a sensible place to begin: hair sits right next to your face, so its color affects how your skin, eyes, and brows read in a photo. But no undertone forbids a color. Preference, upkeep, and your current hair matter as well.
Use this guide to build a short list of two or three shades, then preview them on your own photo. For the step-by-step comparison method, including the exact controls and a record template, read how to compare hair colors on one photo. This guide focuses on choosing what goes on the shortlist.
Check your undertone in good light
Skin tone is how light or deep your skin is. Undertone is the hue underneath: warm, cool, or neutral. Lighting changes both in photos, so check in daylight.
- Daylight, no filter: stand near a window during the day, without makeup or a beauty filter. Warm indoor bulbs make most skin read warmer.
- Jewelry check: if gold looks more natural on you, you may lean warm; if silver does, you may lean cool. If both work, you may be neutral.
- Wrist check: veins that look greener can suggest warm; bluer can suggest cool. This is a rough guide only.
- White versus off-white: hold a bright white and a cream fabric near your face. Whichever looks less harsh is a hint.
If the checks disagree, you are probably neutral, which usually gives you the widest range of options.
Starting points by undertone
These are common starting points. Each row is a shortlist to preview, not a prescription.
| Undertone | Shades often shortlisted | Shades to preview carefully |
|---|---|---|
| Warm | Golden brown, copper, auburn, honey, warm chestnut | Very ashy or blue-toned shades, which can look flat next to warm skin in some photos |
| Cool | Ash brown, cool dark brown, blue-black, platinum, burgundy | Strong gold or orange-toned shades, which can look brassy in some photos |
| Neutral | Most browns, soft black, beige blonde, muted red | Very saturated colors; preview at a lower intensity first |
Your skin tone also matters. Very light and very deep skin often look striking with high-contrast shades. Medium tones often have a wide range.
Think about contrast as well as warmth
Contrast is the difference in lightness between your hair, skin, and brows. It often changes a photo as much as warm versus cool does.
- Keep your natural contrast: a shade within one or two levels of your natural color tends to look the most natural and grows out more gently.
- Raise contrast on purpose: a much darker or lighter shade draws more attention to the hair. Preview it before committing.
- Mind the brows: a large gap between hair and brow color can look unintended. Ask a colorist about brows if you go far from your natural shade.
- Check frames and beard: if you wear glasses or have a beard, look at how the new hair color sits next to them. Glasses by face shape covers frame color.
Preview your shortlist on one photo
Use one sharp, front-facing photo in daylight with your hair visible and no color filter. The photo selection checklist helps you choose.
In the Hair Color Changer, pick Single color, choose your first shade, and keep Intensity and Shine the same for every shade on your shortlist. Generation requires Google sign-in and Credits; check the cost in the tool before starting.
- Same source photo, mode, Intensity, and Shine for every shade.
- Compare each preview with the original first.
- Check how the skin, eyes, and brows read next to the hair.
- Look for unintended changes to the face or haircut.
- Shortlist one shade and note why.
If one preview makes your skin look very different, check whether the edit changed the skin itself rather than just the hair. Use the same-photo comparison guide for a more detailed record.
From preview to salon or dye
Bring the original photo and your preferred preview to a colorist. Ask what is achievable from your current color, how much maintenance it needs, and how it will grow out. Going much lighter usually takes more work than going darker.
If you color at home, follow every instruction on the product, including any allergy test it asks for. A preview cannot predict how a specific product will develop on your hair.
If you are also considering a new cut, change one thing at a time. The hairstyle preview guide explains how to test a cut separately from color.
Sources and method
Prepared by MogScore; updated November 9, 2026. Control names were checked against the current Hair Color Changer. Undertone checks and shade starting points are common styling conventions, not measured outcomes, and no shade is guaranteed to suit a particular person.
Frequently Asked Questions About Hair Color for Skin Tone: How to Shortlist Shades and Preview Them
Answers to common questions about this guide.
Use the guide with a current-photo preview
Start with one clear photo, then use the guide to decide which setup or style change to test next.
Related articles
Continue with the next setup, glossary, or product guide.
Try-On GuideVirtual Hair Color Try-On: How to Compare Shades on One PhotoKeep the photo and controls consistent, inspect the edits, and record why you prefer one shade.
 Style GuideBest Glasses for Your Face Shape: How to Choose and Preview FramesFace shape suggests where to start. Frame size, brow line, bridge fit, and color decide the result, so preview a short list on one photo before buying.
 How-toHow to Look Better in Photos: Light, Angle, Posture, and ExpressionMost unflattering photos come from a few fixable conditions. Find the light, set the angle, relax your posture and expression, and choose the frame on purpose.